Wednesday, May 28, 2014

XBMC project - Post 7 - Interfacing IR Remote to Raspberry Pi

Story Board:
Post 1http://blog.karthiksunil.com/2013/07/installing-home-media-centre-dyi-xbmc.html
Post 2http://blog.karthiksunil.com/2013/07/xbmc-project-what-you-need.html
Post 3http://blog.karthiksunil.com/2013/07/xbmc-project-post-3-operating-systems.html
Post 4http://blog.karthiksunil.com/2013/07/xbmc-project-post-4-installing-openelec.html
Post 5http://blog.karthiksunil.com/2013/07/xbmc-project-post-5-updating-to-latest.html
Post 6http://blog.karthiksunil.com/2014/01/xbmc-project-post-6-installing-nas.html

Background:
Raspberry Pi as XBMC media device without a remote control... !!! Something is wrong. Of course we can use Android and iPhone apps to control using Wi-Fi. But after using for a while, it feels very awkward to look for phone, unlock it, search for the app, launch it, press desired button .. may be to pause the movie ?? Uff not a good idea. How about having our TV or any other existing IR remote to control our XBMC. This post explains how

What you need:
If you having completed installation of XBMC on Raspberry Pi, you just need one Hardware for IR remote to work..I bought IR module from ebay - http://www.ebay.in/itm/181394100511

It looks something as below. It works directly with Raspberry Pi, no soldering etc required


Connections:
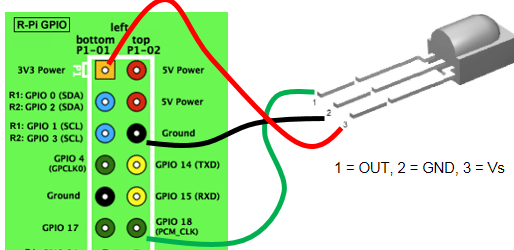
Very straight forward connections, VCC will get 3.3V pin, that is first pin on left lane on GPIO stack. GND will goto any of ground pin. Data pin goes to any of GPIO pins, I selected pin 18. 6th on right stack. As shown below


Settings to be done on OpenElec
Step 1: Update and Upgrade your OpenElec
This is the way you can keep your system upto date. You can do it from XBMC user interface itself.
check this link http://wiki.openelec.tv/index.php?title=Updating_OpenELEC#Update_Methods

Step 2: Install LIRC

Log into OpenElec from a computer using SSH. You can use PuTTy from windows. Default user name and password - root / openelec

Execute following command to install LIRC

sudo apt-get install lirc

This will install LIRC. 

Step 2: Configure LIRC
For IR receiver to work properly you need to configure few settings..

First off OpenElec needs to be know which remote you are going to use and which buttons means what. This information is obtained from a config file called lircd.conf. This file needs to be placed in /storage/.config/lircd.conf

For this to be achieved there is a Utility called irreccord as part of LIRC which can be used.

first all kill all running LIRC services.

killall lircd

Now start the utility

irrecord /storage/.config/lircd.conf

The instructions are straight forward. However you need to name the keys in a specific format.

You can use following names as it explains:
KEY_PLAY
KEY_PAUSE
KEY_STOP
KEY_FORWARD
KEY_REWIND
KEY_HOME
KEY_LEFT
KEY_RIGHT
KEY_UP
KEY_DOWN
KEY_OK
KEY_MUTE
KEY_MENU
KEY_EXIT
KEY_BACK
KEY_NEXT
KEY_PREVIOUS

Step 3: Start the LIRC services
Following command starts the LIRC services. Make sure you have attached data wire to pin 18 as shown above

modprobe lirc_rpi gpio_in_pin=18 gpio_out_pin=1

You can also start the service automatically every time the OpenElec boots, by creating a file /storage/.config/autostart.sh with below content

#!/bin/sh
modprobe lirc_rpi gpio_in_pin=18 gpio_out_pin=1

Make the above file executable
chmod ugo+x  /storage/.config/autostart.sh


Now you are all set. Reboot the system and try using the remote


Watch below video for full explanation .. Don't worry about initial circuit design he has given, you would not need those additional resistors and capacitors..


Thursday, May 15, 2014

Home automaton - RPI - Software Needs - Post 3

Story board
Post 1 - Synopsys
Post 2 - Hwardware Requirements

Status: Just yesterday (14th May 2014), I completed this project and it is working liker a charm :) ... #feeling_achieved

Software design: 
Idea is to control the electrical switch (Relay) from anywhere.. So, we need to softwares in 2 parts

  1. One which triggers relay from Raspberry Pi
  2. The other which manages the web part of it. 

Software program in Raspberry Pi
One of most fascinating features of Pi board is that it has got GPIO (General Purpose Input Output) pins. We have got GPIO libraries, that can be imported into programs to work with GPIO pins in a very easy fashion. Most common programming language used in RPi is Python. The same is used in my project as well. 

Setting up GPIO pins and passing the commands to them. 
As the name suggests, we can set GPIO pins either as input or outputs. For our case we need to set one pin as Output pin. Following code snippet would do that

import RPi.GPIO as  GPIO
GPIO.cleanup()
GPIO.setmode(GPIO.BCM)
GPIO.setup(22,GPIO.OUT)

Above code initializes GPIO pins and sets pin #22 to Output mode.
Below pic can be used as a reference to GPIO pin layout. Note that the numbers are not in any sequence :) 


To set a digital HIGH or digital LOW following code would help

GPIO.output(22, False)
GPIO.output(22, True)

The GPIO pin 22, 8th in the left side will be connected to Relay input pin as shown in my previous post.

Now logic can be written when to turn on relay or turn it off...
More on Software related to web control in next post

Tuesday, April 29, 2014

Home automaton - RPI- Hardware setup - Post 2

Story board
Post 1 - Synopsys

Raspberry pi


Of course you will need RPI. The above annotation shows important parts that need. If you want to use Wi-Fi , you would need a dongle also. You can purchase RPI from many online stores, I bought from Crazy pi for 3k

Dongle also from same place

5v relay board

Bought from eBay http://m.ebay.in/itm?itemId=111309959285, for RS450. Works perfectly with RPI.

Connectors
You would need some jumperconnectors to connect pi and ready board...

Wiring
You will need to run wire from trust board to device which you control.

Monday, April 28, 2014

Home Automation Raspberry pi - Synopsis - Post 1

I'm all set for my 3rd raspberry pi project. POC for home automation.

Requirement: When we are outside house and could not reach by evening, my wife keeps feeling bad that she hasn't switched light on.

Idea: Use RPI GPIO pin to trigger the switch on or off. Control RPI settings from my WordPress database.

Hardware needed: Relay board which can take GPIO input directly. RPI of course. Wiring from circuitry to device to switch on/off

Software: Python program to set a GPIO pin as output. High or low value can be fetched from my WordPress site using pycurl. The values in WordPress table can also be set using pycurl

I'll keep you guys updated with this new series

#raspberrypi #home-automation

Saturday, April 19, 2014

Simply Sedan - Post 4 - Engine Running in

Story line
Simply Sedan - Post 3 - First experience
Simply sedan - Post 2 - Prepare to buy


Running in Rules


This is my first experience with diesel engine. I want to maintain it well. Do went through few sites and understood few running in rules. Even though showroom people say no special running in needed few experts suggests to still
After going through few blogs, followhing are the recommendations. And I followed them till 1.5k kms and till first service


  1. Delay engine start
    Start the engine after 10 or 20 seconds of ignition on. Once you on the ignition, oil starts flowing to engine. In few seconds engine is well lubricated and ready to start

  2. Idling engine
    After starting engine. Keep it idle for couple of minutes then Go slow.

  3. Don't rev
    Don't rev the engine during running in period. Don't cross 2.5k rpm. Keep rpm between 1.2 to 2.5k .


  4. Different rpms
    Keep driving in different rpms. Don't fix at the same rpm for long time. This allows engine to be adjusted to all rpms.


  5. Applying brakes
    Don't apply sudden brakes, as much as possible. Let the brake pads ware and tear happen evenly.

  6. Before stopping engine
    Don't switch off engine immediately. Let the engine idle for couple of minutes, before turning engine off


I followed these rules till first service. till 1500 km. Hopefully it has improved the life of my engine

Friday, April 18, 2014

Tuesday, April 15, 2014

Simply Sedan - Post 3 - First experience

Story line
"Simply sedan - Post 2 -
http://blog.karthiksunil.com/2014/04/simply-sedan-post-2-prepare-to-buy.html

"Simply sedan - Post 1 - Research"   http://blog.karthiksunil.com/2014/04/buying-car-post-1-research.html
 

First experience
It was amazing, even though I had driven car many times before, this was my car. Wow good feeling. After celebration, we fixed Ganesha idol to dashboard, did a mini praying session and started from there. Driving was really easy, never felt like driving diesel car, due to no turbo lag. Amazing !

Pooja
Performed pooja at Ganesha temple at KSRTC layout, uttarahalli road. It went very well. Then visited sisters place and in-laws's place. Everyone liked it

    
Initial mods
Seat covers: Got G sports art leather seat covers for 14k in JC road from a known person. Cream and black combination.  It looks good.

Chrome fittings: For handle covers, window garnish, front grille I got chrome fittings.

Handles were compliment with seat covers :). Front grille fitting costed 3600 from snapdeal, but adhesive was not good, window garnish costed 3200, fitted at Konark's Jayanagar.

Auto Cop: Installed autocop security system which uses the stock remote.

Windows 3M film: With 70% visibility.

Under chassis coating and Teflon coating was compliment from showroom.

Sunday, April 06, 2014

Simply sedan - Post 2 - Prepare to buy

Story line
Post-1: Simply sedan - Post 1 - Research http://blog.karthiksunil.com/2014/04/buying-car-post-1-research.html

Color
Once Verna has been selected, next tough job was select its color. White is the one which looks amazing this car, fluidic lines appears so good on white. But for some reason both Sowmya and I dint want to buy white. Somehow white feels taxi. Also many white Vernas on road.
Next best on Verna was black or maroon. Grey was ok.

Finally we decided on maroon, looks nice when polished :).

We saw the car on blue Hyundai Gandhi bazaar branch. We just loved it. It was relatively new color on Verna, rare on road

Finance
We love SBI. Other than initial delays and hassles, there are no problems. I told I need only in SBI. It's very transparent and I feel secure.

When we approached, they took more than a week to start processing it. It came to me as boon as interim budget was announced at that time. If not delayed, I would have not got 40k benefit.

Delivery
Ok all set for delivery on 24 Feb 2014. We liked delivery celebration. There was no issues with blue Hyundai.

Simply sedan - Post 1 - Research

Idea of buying new car was there from almost 2 years. The old Santro was almost 7 years and wanted to change. We had done one round of research in 2012 itself. But due to few reasons we didn't continue the plan.

Cars considered for first research
1. Fiat Linea
2. Maruthi SX4
3. Hyundai Verna
4. Ford Fiesta New
5. Tata manza

After a long research of 2 months and rounds and rounds of test drives, we had leant towards Linea and next in the list was SX4.

Reasons: Linea has great build quality, excellent looks according to me. Sowmya loved Verna in terms of looks than Linea. Many features were loaded in that beast.
Cons about Linea was, very less space inside, driving was lil discomfort due to full clutch, and there were no dedicated service centers at that time

Sx4 was our next favorite.
Why? Due to comfort feeling, excellent driving experience. Great road clearance, feels very good inside.
Cons: Old model, very less features

Ford Fiesta was very small. Tata manza, even though it has huge space, Sowmya dint like looks.

Verna, why we left last time: We loved features, build quality, ride experience, but only point was it had horrible road clearance. It used to kiss road almost in all road humps.

What we considered now?
This time short listing of cars were very different.
1. Hyundai Verna
2. Honda city diesel
3. Maruthi Ertiga
4. Toyota Etios
5. Renault Duster

Why no European cars? We were very much into looks the cars, Vento and Rapid were more blonde compared others, so they were in list

Let's see car by car, our view

Duster: Pro: Superb looks, very rugged, nice driving experience
Cons: cheap interiors, doesn't feel like 10lac car

Etios: Pro: Less price
Cons: almost everything else. Feels like taxi, horrible drive experience, no power at all

Ertiga: Pro: Superb utility vehicle, 7 seater for sedan price, very comfortable all sense. Good value for money
Cons: not a sedan ;), won't feel richness, no Bluetooth ;)

City diesel: Pro: Lovely new design (copied fluidic concept from Hyundai, I would say), excellent space management, a.c. duct for rear seat, loaded with features
Cons: New to diesel engine, little expensive, headroom could have been improved, no offers no discounts

Verna: Pro: We had already soft corner, they had improved ground clearance. Sexy looks, loaded with features, feels very posh
Cons: seats could have lil broader, rear seating comfort could have been improved, year end offer was extended and i got free insurance

Verdict went in favour of Verna, booked the vehicle on 30 Jan 2014.

Tuesday, January 14, 2014

XBMC project - Post 6 - Installing NAS

Story Board:
Post 1http://blog.karthiksunil.com/2013/07/installing-home-media-centre-dyi-xbmc.html
Post 2http://blog.karthiksunil.com/2013/07/xbmc-project-what-you-need.html
Post 3http://blog.karthiksunil.com/2013/07/xbmc-project-post-3-operating-systems.html
Post 4http://blog.karthiksunil.com/2013/07/xbmc-project-post-4-installing-openelec.html
Post 5http://blog.karthiksunil.com/2013/07/xbmc-project-post-5-updating-to-latest.html

Make or Buy decision :)

The latest on my XBMC project is that, I added NAS to my landscape. After a lof research, I decided to buy Iomega IX2-200 as my NAS. Initially I thought of building my own NAS using an old PC and installing FreeNAS on it. May be I did not have enough enthusiasm or din't get right hardware, I dropped the idea and went for a ready made NAS. I bought used NAS (IX2) from eBay. Actually it was not used, the box seal was just open, everything was intact. Seller could not sell as new as seal was opened. Seller was from Bangalore, I went to his shop in SP road and checked the box, tested and bought it for RS 10,500. More over he gave the bill as of current date so that I get company warranty for 2 years from purchase date. MRP of new box was RS 19,000. It was a good deal for me 

Upgrading firmware
This is the first thing I did. The box import date was Apr 2013. As it was pretty old, I wanted to upgrade to latest firmware. Downloaded from Lenovo, Iomega site and uploaded to NAS and upgraded. It upgraded without any glitch. 

Using NAS
It was pretty straight forward. Almost plug n play :).. Created users/ admin users etc and started using web interface. All was well :)

My Initial feeling
Slowwwwwwwwwww file transfer. I get 1-2 mb/s using SMB file transfer. FTP was better 10-15 mb/s.
Otherwise it is just fine.

Backed up my old 1 TB HDD, my phone, my laptop. Everything took almost 2 days.

Integrating with XBMC
Added my NAS as source in XBMC and it could stream audio, video and pictures without any issues.. No issues with streaming media files


Monday, July 29, 2013

XBMC project - Post 5 - updating to latest version

Story Board:
Post 1http://blog.karthiksunil.com/2013/07/installing-home-media-centre-dyi-xbmc.html
Post 2http://blog.karthiksunil.com/2013/07/xbmc-project-what-you-need.html
Post 3: http://blog.karthiksunil.com/2013/07/xbmc-project-post-3-operating-systems.html
Post 4: http://blog.karthiksunil.com/2013/07/xbmc-project-post-4-installing-openelec.html

This is what I did to install 3.1.2. You can follow these steps for even downgrading.

1. Follow steps in http://squirrelhosting.co.uk/hosting-blog/hosting-blog-info.php?id=9 
Get 3.0.6 img file and install
http://resources.pichimney.com/OpenELEC/official_images/?C=M;O=D

Later get official 3.1.2 (or any other latest version) kernel, system md5 files from http://openelec.tv/get-openelec/download/viewcategory/10-raspberry-pi-builds

Then, follow link below to update to highest version
http://wiki.openelec.tv/index.php?title=Updating_OpenELEC#Manually_Updating_OpenELEC

Thursday, July 18, 2013

XBMC project - Post 4 - Installing OpenELEC

Story Board:

What you need
1.  Pi
2. SD card
3. Computer
4. USB drive, optional but recommended for better performance
Instructions
If you are using Linux based system use following link for instruction
============================
If you are using windows machine to install  follow the instructions in link below
(this method is tested and works fine)
To simplify, I skipped formatting and partition step. I used normal windows format. Just make sure that you select FAT32.I used suggested win32 disk imager to write image file to SD card


Once completed you can boot raspberry pi with SD card. I have tried at this stage. All feature works without any problem with functionality, however screen navigation and add on experience are not that great. A lot of lag. Follow the instruction in below link to move "/storage" partition to USB drive, which boosts the performance drastically.

Follow the instruction mentioned in below link to get the /storage into USB drive. Only deviation I did was to create a bootable GPARTED CD drive and boot from it to move the partition.
http://forum.xbmc.org/showthread.php?tid=150297&page=4 

Assuming that you have LAN router, cable, HDMI TV, a USB Keyboard, another computer which is on the same LAN.

1. Install OpenELEC on SD card as explained above. 
2. Format USB Drive - FAT32
3. Insert SD Card, USB Drive both into Raspberry pi
4. Connect USB Keyboard
5. Connect HDMI Cable to TV
6. Connect power adapter to pi and turn it on

Above steps were derived from link below


Next Post:
Upgrading to 3.1.2
Installing wireless adapter

Wednesday, July 17, 2013

XBMC Project - Post 3 - Operating Systems for Raspberry pi

Story Board:

  1. Post 1: http://blog.karthiksunil.com/2013/07/installing-home-media-centre-dyi-xbmc.html
  2. Post 2: http://blog.karthiksunil.com/2013/07/xbmc-project-what-you-need.html


Before you go ahead with the installation let's see how to connect things together

Connecting Pi to TV and other gadgets is as simple as plugging in power adapter to your laptop.


  • Connect your HDMI cable to Pi and TV
  • Insert SD Card
  • Insert your mobile power adapter to Pi (micro USB) - Make sure that current rating is more than 700mA
  • If you have wireless adapter, plug it in one of the USB ports
  • Plug key board in another USB port for initial setup

And that's it..

Now you have got Pi, you have got power of a computing engine on your palm. Many people use Pi in very different purpose. Most popular flavor is to use it as an XBMC server. This series of posts is to achieve the same. We have many options of OSs to be installed on Pi. Refere http://elinux.org/RPi_Distributions

As our goal is to implement XBMC on Pi, let's concentrate on XBMC distributions. Following are the options . (http://wiki.xbmc.org/?title=Raspberry_Pi/FAQ#Installing_XBMC_on_the_Raspberry_Pi)

  1. Raspbian
  2. OpenELEC
  3. Xbian
I have instaled OpenELEC and recommed strongly. However, OpenELEC works very smoothly when installed on USB Drive instead of SD card. I will write a separate post on it. Advantage of OpenELEC is that, it has been build from the scratch for the purpose of XBMC and only XBMC. Its light, fast and accurate. Visit openelec.tv 

My next post will be on instaling OpenELEC on SD card and then move to USB drive for snappiness. 

Tuesday, July 16, 2013

XBMC project - Post 2 - What you need

Story Board:

  1. Post 1: http://blog.karthiksunil.com/2013/07/installing-home-media-centre-dyi-xbmc.html


In this post I will try to make a list of things you need to establish full working solution
Goal: To achieve full working xbmc which can be used by even novice, who it's not interested experimenting all these things :), also to stream all your own videos, pictures,  movies and songs from external hard drive wirelessly
1. Raspberry pi circuit: So what is this
Raspberry pi is not edible :). It's a small cute circuit board which gives you the power of full working computer. Following are the Ports/external interfaces available
a. Hdmi output - out goes road monitor, in our case out will be TV
b. 2 USB Ports, almost anything or takes
c. SD card slot, has the bootloader and OS
d. Power slot, you micro USB mobile phone charger is good enough
c. Audio and video out, in case you don't want to use hdmi (in our case these are obsolete)
Cost: I got it for ₹ 2900 plus taxes. I went to JP Nagar in person to buy it, you can visit crazypi.com  or contact Ranganath. Just note that prices are already hiked due to falling rupee value against dollar
2. SD card: you can use an existing one if you already have. Better to user high class one
3. Wireless mini keyboard (optional): This is optional, but very useful and cute enough to not to opt out. Cost ₹1500
4. Wireless adapter: I got d link n300 one for ₹900 again from crazypi.com. Note all wireless adapters are compatible with pi, even tough pi works without this, I strongly recommend to have this, assuming that you have wireless router and have access to internet through it
5. Wireless N router with USB:(Optional)
You need this if you want to stream your own contents from your hard disk wirelessly. This could be an alternative to an expensive NAS. Of course you have certain  draw backs, will  explain in some later posts.
I bought dlink N300 2750u . One of the coolest routers, costed ₹2200 from flipkart. You can have others but make sure that it has USB storage sharing, supports UPnP.
6. Hdmi cable: This is mandatory for media center so better buy it. You get it for around ₹800.
7. Case for pi: There are different case options, I suggest to buy a decent looking one. I bought black case from crazypi.com, it costed aground ₹400.
Total cost of all these gadgets
Pi - ₹ 3100
Wireless adapter - ₹900
hdmi cable - ₹800
SD card - ₹350
Wireless router - ₹2200
Wireless mini keyboard - ₹1500
Case - ₹ 400
Total (including optional devices) ₹9350

My next post will be on choosing OS for your pi

XBMC project - Post 1 - See the end

Today, one of my dreams have come true. I have installed my home media center, with as affordable price as it can be. I am going to write a series of posts regarding it.

Summary:
XBMC running on my raspberry pi. OpenElec version of Xbmc
Established wifi connection to my pi using d-link wifi adapter n300

I have also established network drive using my new wifi router with USB. All my media can be streamed from my external 1 TB drive.

Create amazing library of my movies using useful scrappers

Using filmi by nature add on, I can stream HD videos online

Using Yatse Android app I can control xbmc
Using Yatse+ plugin I can stream my media directly from phones and tablets

I can start slide show of my old picture archives just by a click

Play my music from anywhere

Play YouTube videos on big screen

You know, its really good feeling. DIY XBMC, is really cool

Friday, January 25, 2013

Trip to Karwar - planning

My dear friend Sridhar sent an email sometime in 3rd week of December proposing for a trip for year end or 1st week of Jan. At the same time even Sowmya and I were thinking to get out somewhere. It so happened that none of the other friends could make it. So it turned out to be both our families.

We both started to plan things out, starting from place, mode of transport, itenary, things to pack, thinks to buy and what not,  Sri created a planning document on google drive and we started to update then in collaboration. In coupe of days things got frozen on place, ie Karwar and we decided to take bus. The date was initially year end 29th to 31st. But wet didn't get accommodation anywhere. And even bus fare was exuberant. So we decided to move date by one week. Our new date was 5th to 7th. We decided to take leave on Monday. We wanted to take it cool as little ones would be there. Adya and Swaraj both are of almost same age.

Sridhar got bus booked and I got 2 rooms in a resort called Tarang booked. Bus was around 600 per person one way. It was sleeper coach. He got Sugama for on going and SRS for return journey. Tarang resort is in little remote place off karwar town. Around 7 km near Sadashiva ghad. But the review and photos were good on trip advisor and we decided to book that. It costed per room 1.8k per day. Which was good enough for us. The previous week the same was around 2.5k. Only concern was, as it was away from town our committing to places would be tough. Other options for us were, devbghag jungle resorts, estuary resorts, the lotus resort. Out of which jungle resorts we did not get booking, Lotus was way  too expensive and estuary response was not that great. Later we realized it was good that wet din't get there :) as the approach road was horrible

We started logging our expenses in the google drive which was designed to automatically calculates and shares the amount and tells how much should one pay to another at the end of trip.

Ladies at home started to pack things and we supported them.

Monday, December 10, 2012

Kalyani, my mom, my guru, my mentor

Amma, the word is as powerful as she is. She not only gave birth to me, she dedicated her entire life for mine and that of my sisters and our families.

She went through tough times on her childhood, she started to work for family at the age of 16. She started to teach, which is her favourite job. Unfortunately she could not continue her education due to family reasons.

She became teacher in one of the good schools and was enjoying her profession, till she left her job again because of family reasons.  She had married by then with kids.

She studied on her own and graduated as Hindi visharada. She also learnt astrology and had passed  examination. 
Tough time continued even later. She had to teach students at home, prepare home made food items and sold, she had to cut and stitch clothes of others for leading life.

She took providing good education for all 3 of us as challenge as she wanted us to become independent financially, socially and in all other means. She also wanted us to live in own house and so she struggled to make new home just by the time my dad retired, and she did it.

She had to get both my sisters married to good families and she struggled for that as well and completed that responsibility as well without any pointed fingers.

By the time I could take care of her she was already tired and diabetic had already weakened her. By that time she had already lost my dad as well. She was alone.

Then she got me a great wife. She knew how to handle things. She started giving me and Sowmya responsibility one after the other but still she was committed and dedicated for family. Without her advise and blessings I could not do anything, she encouraged me to build Madilu, without her I would have sold the plot. After Adya's advent, she started to enjoy life. She used to play with her. Adya loved her ajji too. Daily she used to ask whether or not she took her tablets.

By pulling heavy cart of family on rough roads she never forgot her social responsibility. She taught many of her students many of spiritual works. She wrote a book on Lalitha sahasra nama. All the books got sold out and still more requirements. As an astrologer she helped many people in their lives. As a counsellor she helped many demotivated souls, many came to her to discuss their problem.

On the festival day of her beloved Godess, Lalitha parameshwari she decided to take a leave. The leave that one cannot imagine, in front of all her beloved students, in front of all her children, in front of her beloved Goddess Lalitha. The leave that took place, 5 min before which the entire home was in celebrating mood.

I know Amma, you were tired. But we still need you, I know you will always be  within us and helping us in each step we keep. Every moment we think, that if Amma was there what she would have done , what she would have suggested. Your memory is our life now, your life is guide for us.

Amma, you did not give any chance for us to pay back, until the last breath you ran  show on your own. Please give us the courage of leading life with such bravery, kindness, tolerance, intellect and thoughtfulness, that you adopted in your life. 

Monday, October 08, 2012

Leveraging Android - Part 3 - What's the meaning of Rooting the phone

Prequel posts  Part1   Part2

What's the meaning of Rooting phone

I am not an Android developer per say, but I understand the concept in layman terms. When you say rooting phone, you are getting more powers on your device. Powers!! yes you read it right. More powers. So what you mean by more powers.

To understand it better we need to understand Security concept a little bit. Android is Linux based operating system. Linux is much more controlled environment. Role based permissions can be set for different actions on the operating system. Its like, at your office, who can enter which area of the office. Not everyone have access to server rooms and neither to finance departments etc. 

In similar way within Linux you can fix up the permissions. So in Android. Having root access makes you the BOSS of your device. All the applications (apps) can be considered as your folks reporting to you. Any app wants to have any special permission to read/ write in system folders, or any "not-normal" thing, Android will intimate BOSS, that is you, saying so-and-so app wants to do so-and-so, you want to allow. How cool is it. You can say yes, no, remember this selection and always allow him to do that job etc. 

Advantages and Disadvantages of Rooting your phone

Positivies
  • As you have already read, above, it allows you do more things than you could have done on a non rooted phone
  • It makes you the BOSS
  • More control on your device. You can overclock and undervolt your CPU (Will explain in future posts)
  • Some cool and important Apps like Titanium Backup need root access.
  • You can browse entire system file systems. Usually you can only browse anything in /sdcard and /external_sd only. Once rooted apps allow to browse started from "/". which is called root folder. 
  • You can play around and Tweak CPU (Central Processor), GPU (Graphic Processor), Touch sensitivity  and many other hardware related entities
  • You can install some cool custom ROMs (I will explain about ROMs in later posts) example: CyanogenMod
Negatives
  • It might void your manufacture warranty 
  • Once you are made BOSS Android expects you to take care of vulnerable risks. So you need to be more careful
  • Apps can actually do anything and everything. They can influence the hardware as well. So risk of damaging your phone might be there
How to Mitigate risk
You can always unroot your phone. So that you reduce the impact and root it back, when needed :) 

How to root your Phone
There are multiple ways to do it and depends on your device. Mine is Samsung Galaxy S2 and I followed the steps explained in following thread . Other devices should have similar way. Please search in google or in XDA.

Saturday, October 06, 2012

Leveraging Android - Part 2 - Apps

My favourites

Games
1. Hot pursuit, need for speed
2. Temple run
3. Sprinkle
4. Triple town
5. Cut the rope

Media
1. Power amp. Love the features, lock screen controls etc
2. Far burst cam - wow, lovely
3. Pic say- handy tool for quick edits
4. Fish bowl gallery - nice tool for slide show
5. MX player. What a lovely video player
6. Skifta. Amazing tool for dlna streaming
7. Screen cast. Screen video capture tool

Powerful tools
1. Tasker - what can I say about it. My most fav tool too control entire phone based on various situations. I will write separate post for this
2. Titanium backup - excellent backup tool
3. OS monitor - gives OS level details
4. ES explorer - powerful explorer and editor
5. Aldiko - fav book reader
6. Dropbox -.need any explanation?
7. Evernote. Amazing note taking app with cloud backup with PC tool and Web based support as well.

Socializing
1. Facebook - app is horrible, do I use FB Light
2. Google plus
3. Flip board. What an amazing magazine like social app. Integrates almost everything
4. Google chat
5. Skype
6. Whatsapp
7. Viber
8. Tapatalk - forum based discussions

Network tools
1. ANDftp - my fav ftp client
2. Folder sync - folder syncing with phone local with remote folder. Love this tool
3. 2X client- remote desktop connection
4. Blogger - using this tool to write blog posts

Office stuffs
1. Touch down email client for outlook mails and calendar
2. Lync for Microsoft 360 chats
3. Polaris for office documents

Note:
Some of the above apps are paid apps
Some of the above apps need root access (Explain in future posts)

Friday, October 05, 2012

Leveraging Android - Part 1

Background

After my successful series of "Build and Make" which talks about building and making your home, now let me write something on Technology side. It's about Smart phones and more specifically on Android. I will try to share my experience, knowledge and interesting links in this brand new series called "Leveraging Android"

Enormous Growth

Smart phones have now really grown into big banyan tree. We have seen Android growing almost from no where to what we have now. The open source community have contributed  much more for this catalytic growth. It has almost beaten the Apple in such a short span of time. We have seen many Android vs iPhone comparison articles, videos(Link) and what not. But at the end, smart phone users are at receiving end. Technology have grown so big that you can think of anything you have it on your hand, literally. :)


My Experience

My first Android experience started from my beloved Samsung Galaxy 5. Very small phone on hand and running on Froyo. I was mesmerized with Android OS and immediately had fallen love with it.

I had it for 18 months and sold it, before I bought my current fascination Samsung Galaxy S2 (post). Before I sold, I had put my hands into deeper and had tried rooting, flashing and upgraded my OS to Gingerbread. I was so happy the day I had Gingerbread on my Galaxy 5 phone. I could tether my 3G to my laptop. That was the coolest feature I had ever seen.

Oh! are you murmuring! "Wait a minute,step back, don't talk Greek and Latin?" What are these jargons - Rooting, Flashing, Tethering etc ? Even I did not know them. I started reading XDA Forums and learnt about each of them slowly. That's when I realized how many tech geeks and maniacs out there.

Apps and Widgets

Anyone who starts to use the smart phone (of course little more than making and receiving calls) would know what apps and widgets are. App is acronym for application. Widgets are live elements on your screen which provides more details without you launching the app.

Apps make the world of Android so much interesting and happening. I will have separate post on my favorite apps

Usually widgets are part of apps.
Examples

  • Weather Widget will provide the current weather in specified location 
  • Clock widget will show the time in specified time zone
  • Photo frame widget displays a bunch of photos one after the other


Let me wind my first post now and continue later.. Thanks for reading