Story Board:
Post 1: http://blog.karthiksunil.com/2013/07/installing-home-media-centre-dyi-xbmc.html
Post 2: http://blog.karthiksunil.com/2013/07/xbmc-project-what-you-need.html
Post 3: http://blog.karthiksunil.com/2013/07/xbmc-project-post-3-operating-systems.html
Post 4: http://blog.karthiksunil.com/2013/07/xbmc-project-post-4-installing-openelec.html
Post 5: http://blog.karthiksunil.com/2013/07/xbmc-project-post-5-updating-to-latest.html
Post 6: http://blog.karthiksunil.com/2014/01/xbmc-project-post-6-installing-nas.html
Background:
Raspberry Pi as XBMC media device without a remote control... !!! Something is wrong. Of course we can use Android and iPhone apps to control using Wi-Fi. But after using for a while, it feels very awkward to look for phone, unlock it, search for the app, launch it, press desired button .. may be to pause the movie ?? Uff not a good idea. How about having our TV or any other existing IR remote to control our XBMC. This post explains how
What you need:
If you having completed installation of XBMC on Raspberry Pi, you just need one Hardware for IR remote to work..I bought IR module from ebay - http://www.ebay.in/itm/181394100511
It looks something as below. It works directly with Raspberry Pi, no soldering etc required

Connections:
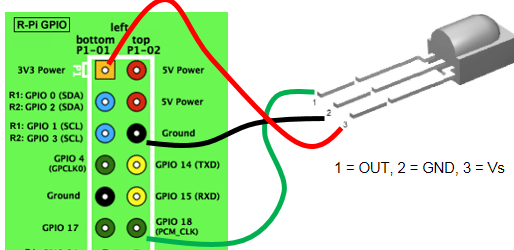
Very straight forward connections, VCC will get 3.3V pin, that is first pin on left lane on GPIO stack. GND will goto any of ground pin. Data pin goes to any of GPIO pins, I selected pin 18. 6th on right stack. As shown below
Settings to be done on OpenElec
Step 1: Update and Upgrade your OpenElec
This is the way you can keep your system upto date. You can do it from XBMC user interface itself.
check this link http://wiki.openelec.tv/index.php?title=Updating_OpenELEC#Update_Methods
Step 2: Install LIRC
Log into OpenElec from a computer using SSH. You can use PuTTy from windows. Default user name and password - root / openelec
Execute following command to install LIRC
sudo apt-get install lirc
This will install LIRC.
Step 2: Configure LIRC
For IR receiver to work properly you need to configure few settings..
First off OpenElec needs to be know which remote you are going to use and which buttons means what. This information is obtained from a config file called lircd.conf. This file needs to be placed in /storage/.config/lircd.conf
For this to be achieved there is a Utility called irreccord as part of LIRC which can be used.
first all kill all running LIRC services.
killall lircd
Now start the utility
irrecord /storage/.config/lircd.conf
The instructions are straight forward. However you need to name the keys in a specific format.
You can use following names as it explains:
KEY_PLAY
KEY_PAUSE
KEY_STOP
KEY_FORWARD
KEY_REWIND
KEY_HOME
KEY_LEFT
KEY_RIGHT
KEY_UP
KEY_DOWN
KEY_OK
KEY_MUTE
KEY_MENU
KEY_EXIT
KEY_BACK
KEY_NEXT
KEY_PREVIOUS
Step 3: Start the LIRC services
Following command starts the LIRC services. Make sure you have attached data wire to pin 18 as shown above
modprobe lirc_rpi gpio_in_pin=18 gpio_out_pin=1
You can also start the service automatically every time the OpenElec boots, by creating a file /storage/.config/autostart.sh with below content
#!/bin/sh
modprobe lirc_rpi gpio_in_pin=18 gpio_out_pin=1
Make the above file executable
chmod ugo+x /storage/.config/autostart.sh
Now you are all set. Reboot the system and try using the remote
Watch below video for full explanation .. Don't worry about initial circuit design he has given, you would not need those additional resistors and capacitors..
Post 1: http://blog.karthiksunil.com/2013/07/installing-home-media-centre-dyi-xbmc.html
Post 2: http://blog.karthiksunil.com/2013/07/xbmc-project-what-you-need.html
Post 3: http://blog.karthiksunil.com/2013/07/xbmc-project-post-3-operating-systems.html
Post 4: http://blog.karthiksunil.com/2013/07/xbmc-project-post-4-installing-openelec.html
Post 5: http://blog.karthiksunil.com/2013/07/xbmc-project-post-5-updating-to-latest.html
Post 6: http://blog.karthiksunil.com/2014/01/xbmc-project-post-6-installing-nas.html
Background:
Raspberry Pi as XBMC media device without a remote control... !!! Something is wrong. Of course we can use Android and iPhone apps to control using Wi-Fi. But after using for a while, it feels very awkward to look for phone, unlock it, search for the app, launch it, press desired button .. may be to pause the movie ?? Uff not a good idea. How about having our TV or any other existing IR remote to control our XBMC. This post explains how
What you need:
If you having completed installation of XBMC on Raspberry Pi, you just need one Hardware for IR remote to work..I bought IR module from ebay - http://www.ebay.in/itm/181394100511
It looks something as below. It works directly with Raspberry Pi, no soldering etc required
Connections:
Very straight forward connections, VCC will get 3.3V pin, that is first pin on left lane on GPIO stack. GND will goto any of ground pin. Data pin goes to any of GPIO pins, I selected pin 18. 6th on right stack. As shown below
Settings to be done on OpenElec
Step 1: Update and Upgrade your OpenElec
This is the way you can keep your system upto date. You can do it from XBMC user interface itself.
check this link http://wiki.openelec.tv/index.php?title=Updating_OpenELEC#Update_Methods
Step 2: Install LIRC
Log into OpenElec from a computer using SSH. You can use PuTTy from windows. Default user name and password - root / openelec
Execute following command to install LIRC
sudo apt-get install lirc
This will install LIRC.
Step 2: Configure LIRC
For IR receiver to work properly you need to configure few settings..
First off OpenElec needs to be know which remote you are going to use and which buttons means what. This information is obtained from a config file called lircd.conf. This file needs to be placed in /storage/.config/lircd.conf
For this to be achieved there is a Utility called irreccord as part of LIRC which can be used.
first all kill all running LIRC services.
killall lircd
Now start the utility
irrecord /storage/.config/lircd.conf
The instructions are straight forward. However you need to name the keys in a specific format.
You can use following names as it explains:
KEY_PLAY
KEY_PAUSE
KEY_STOP
KEY_FORWARD
KEY_REWIND
KEY_HOME
KEY_LEFT
KEY_RIGHT
KEY_UP
KEY_DOWN
KEY_OK
KEY_MUTE
KEY_MENU
KEY_EXIT
KEY_BACK
KEY_NEXT
KEY_PREVIOUS
Step 3: Start the LIRC services
Following command starts the LIRC services. Make sure you have attached data wire to pin 18 as shown above
modprobe lirc_rpi gpio_in_pin=18 gpio_out_pin=1
You can also start the service automatically every time the OpenElec boots, by creating a file /storage/.config/autostart.sh with below content
#!/bin/sh
modprobe lirc_rpi gpio_in_pin=18 gpio_out_pin=1
Make the above file executable
chmod ugo+x /storage/.config/autostart.sh
Now you are all set. Reboot the system and try using the remote
Watch below video for full explanation .. Don't worry about initial circuit design he has given, you would not need those additional resistors and capacitors..