Wednesday, May 28, 2014

XBMC project - Post 7 - Interfacing IR Remote to Raspberry Pi

Story Board:
Post 1http://blog.karthiksunil.com/2013/07/installing-home-media-centre-dyi-xbmc.html
Post 2http://blog.karthiksunil.com/2013/07/xbmc-project-what-you-need.html
Post 3http://blog.karthiksunil.com/2013/07/xbmc-project-post-3-operating-systems.html
Post 4http://blog.karthiksunil.com/2013/07/xbmc-project-post-4-installing-openelec.html
Post 5http://blog.karthiksunil.com/2013/07/xbmc-project-post-5-updating-to-latest.html
Post 6http://blog.karthiksunil.com/2014/01/xbmc-project-post-6-installing-nas.html

Background:
Raspberry Pi as XBMC media device without a remote control... !!! Something is wrong. Of course we can use Android and iPhone apps to control using Wi-Fi. But after using for a while, it feels very awkward to look for phone, unlock it, search for the app, launch it, press desired button .. may be to pause the movie ?? Uff not a good idea. How about having our TV or any other existing IR remote to control our XBMC. This post explains how

What you need:
If you having completed installation of XBMC on Raspberry Pi, you just need one Hardware for IR remote to work..I bought IR module from ebay - http://www.ebay.in/itm/181394100511

It looks something as below. It works directly with Raspberry Pi, no soldering etc required


Connections:
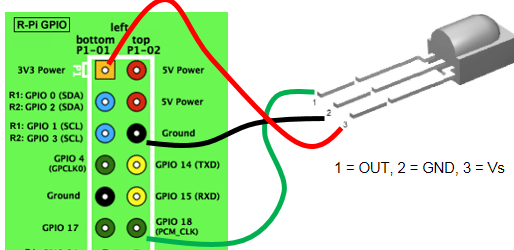
Very straight forward connections, VCC will get 3.3V pin, that is first pin on left lane on GPIO stack. GND will goto any of ground pin. Data pin goes to any of GPIO pins, I selected pin 18. 6th on right stack. As shown below


Settings to be done on OpenElec
Step 1: Update and Upgrade your OpenElec
This is the way you can keep your system upto date. You can do it from XBMC user interface itself.
check this link http://wiki.openelec.tv/index.php?title=Updating_OpenELEC#Update_Methods

Step 2: Install LIRC

Log into OpenElec from a computer using SSH. You can use PuTTy from windows. Default user name and password - root / openelec

Execute following command to install LIRC

sudo apt-get install lirc

This will install LIRC. 

Step 2: Configure LIRC
For IR receiver to work properly you need to configure few settings..

First off OpenElec needs to be know which remote you are going to use and which buttons means what. This information is obtained from a config file called lircd.conf. This file needs to be placed in /storage/.config/lircd.conf

For this to be achieved there is a Utility called irreccord as part of LIRC which can be used.

first all kill all running LIRC services.

killall lircd

Now start the utility

irrecord /storage/.config/lircd.conf

The instructions are straight forward. However you need to name the keys in a specific format.

You can use following names as it explains:
KEY_PLAY
KEY_PAUSE
KEY_STOP
KEY_FORWARD
KEY_REWIND
KEY_HOME
KEY_LEFT
KEY_RIGHT
KEY_UP
KEY_DOWN
KEY_OK
KEY_MUTE
KEY_MENU
KEY_EXIT
KEY_BACK
KEY_NEXT
KEY_PREVIOUS

Step 3: Start the LIRC services
Following command starts the LIRC services. Make sure you have attached data wire to pin 18 as shown above

modprobe lirc_rpi gpio_in_pin=18 gpio_out_pin=1

You can also start the service automatically every time the OpenElec boots, by creating a file /storage/.config/autostart.sh with below content

#!/bin/sh
modprobe lirc_rpi gpio_in_pin=18 gpio_out_pin=1

Make the above file executable
chmod ugo+x  /storage/.config/autostart.sh


Now you are all set. Reboot the system and try using the remote


Watch below video for full explanation .. Don't worry about initial circuit design he has given, you would not need those additional resistors and capacitors..


Thursday, May 15, 2014

Home automaton - RPI - Software Needs - Post 3

Story board
Post 1 - Synopsys
Post 2 - Hwardware Requirements

Status: Just yesterday (14th May 2014), I completed this project and it is working liker a charm :) ... #feeling_achieved

Software design: 
Idea is to control the electrical switch (Relay) from anywhere.. So, we need to softwares in 2 parts

  1. One which triggers relay from Raspberry Pi
  2. The other which manages the web part of it. 

Software program in Raspberry Pi
One of most fascinating features of Pi board is that it has got GPIO (General Purpose Input Output) pins. We have got GPIO libraries, that can be imported into programs to work with GPIO pins in a very easy fashion. Most common programming language used in RPi is Python. The same is used in my project as well. 

Setting up GPIO pins and passing the commands to them. 
As the name suggests, we can set GPIO pins either as input or outputs. For our case we need to set one pin as Output pin. Following code snippet would do that

import RPi.GPIO as  GPIO
GPIO.cleanup()
GPIO.setmode(GPIO.BCM)
GPIO.setup(22,GPIO.OUT)

Above code initializes GPIO pins and sets pin #22 to Output mode.
Below pic can be used as a reference to GPIO pin layout. Note that the numbers are not in any sequence :) 


To set a digital HIGH or digital LOW following code would help

GPIO.output(22, False)
GPIO.output(22, True)

The GPIO pin 22, 8th in the left side will be connected to Relay input pin as shown in my previous post.

Now logic can be written when to turn on relay or turn it off...
More on Software related to web control in next post

Tuesday, April 29, 2014

Home automaton - RPI- Hardware setup - Post 2

Story board
Post 1 - Synopsys

Raspberry pi


Of course you will need RPI. The above annotation shows important parts that need. If you want to use Wi-Fi , you would need a dongle also. You can purchase RPI from many online stores, I bought from Crazy pi for 3k

Dongle also from same place

5v relay board

Bought from eBay http://m.ebay.in/itm?itemId=111309959285, for RS450. Works perfectly with RPI.

Connectors
You would need some jumperconnectors to connect pi and ready board...

Wiring
You will need to run wire from trust board to device which you control.

Monday, April 28, 2014

Home Automation Raspberry pi - Synopsis - Post 1

I'm all set for my 3rd raspberry pi project. POC for home automation.

Requirement: When we are outside house and could not reach by evening, my wife keeps feeling bad that she hasn't switched light on.

Idea: Use RPI GPIO pin to trigger the switch on or off. Control RPI settings from my WordPress database.

Hardware needed: Relay board which can take GPIO input directly. RPI of course. Wiring from circuitry to device to switch on/off

Software: Python program to set a GPIO pin as output. High or low value can be fetched from my WordPress site using pycurl. The values in WordPress table can also be set using pycurl

I'll keep you guys updated with this new series

#raspberrypi #home-automation

Saturday, April 19, 2014

Simply Sedan - Post 4 - Engine Running in

Story line
Simply Sedan - Post 3 - First experience
Simply sedan - Post 2 - Prepare to buy


Running in Rules


This is my first experience with diesel engine. I want to maintain it well. Do went through few sites and understood few running in rules. Even though showroom people say no special running in needed few experts suggests to still
After going through few blogs, followhing are the recommendations. And I followed them till 1.5k kms and till first service


  1. Delay engine start
    Start the engine after 10 or 20 seconds of ignition on. Once you on the ignition, oil starts flowing to engine. In few seconds engine is well lubricated and ready to start

  2. Idling engine
    After starting engine. Keep it idle for couple of minutes then Go slow.

  3. Don't rev
    Don't rev the engine during running in period. Don't cross 2.5k rpm. Keep rpm between 1.2 to 2.5k .


  4. Different rpms
    Keep driving in different rpms. Don't fix at the same rpm for long time. This allows engine to be adjusted to all rpms.


  5. Applying brakes
    Don't apply sudden brakes, as much as possible. Let the brake pads ware and tear happen evenly.

  6. Before stopping engine
    Don't switch off engine immediately. Let the engine idle for couple of minutes, before turning engine off


I followed these rules till first service. till 1500 km. Hopefully it has improved the life of my engine

Friday, April 18, 2014

Tuesday, April 15, 2014

Simply Sedan - Post 3 - First experience

Story line
"Simply sedan - Post 2 -
http://blog.karthiksunil.com/2014/04/simply-sedan-post-2-prepare-to-buy.html

"Simply sedan - Post 1 - Research"   http://blog.karthiksunil.com/2014/04/buying-car-post-1-research.html
 

First experience
It was amazing, even though I had driven car many times before, this was my car. Wow good feeling. After celebration, we fixed Ganesha idol to dashboard, did a mini praying session and started from there. Driving was really easy, never felt like driving diesel car, due to no turbo lag. Amazing !

Pooja
Performed pooja at Ganesha temple at KSRTC layout, uttarahalli road. It went very well. Then visited sisters place and in-laws's place. Everyone liked it

    
Initial mods
Seat covers: Got G sports art leather seat covers for 14k in JC road from a known person. Cream and black combination.  It looks good.

Chrome fittings: For handle covers, window garnish, front grille I got chrome fittings.

Handles were compliment with seat covers :). Front grille fitting costed 3600 from snapdeal, but adhesive was not good, window garnish costed 3200, fitted at Konark's Jayanagar.

Auto Cop: Installed autocop security system which uses the stock remote.

Windows 3M film: With 70% visibility.

Under chassis coating and Teflon coating was compliment from showroom.

Sunday, April 06, 2014

Simply sedan - Post 2 - Prepare to buy

Story line
Post-1: Simply sedan - Post 1 - Research http://blog.karthiksunil.com/2014/04/buying-car-post-1-research.html

Color
Once Verna has been selected, next tough job was select its color. White is the one which looks amazing this car, fluidic lines appears so good on white. But for some reason both Sowmya and I dint want to buy white. Somehow white feels taxi. Also many white Vernas on road.
Next best on Verna was black or maroon. Grey was ok.

Finally we decided on maroon, looks nice when polished :).

We saw the car on blue Hyundai Gandhi bazaar branch. We just loved it. It was relatively new color on Verna, rare on road

Finance
We love SBI. Other than initial delays and hassles, there are no problems. I told I need only in SBI. It's very transparent and I feel secure.

When we approached, they took more than a week to start processing it. It came to me as boon as interim budget was announced at that time. If not delayed, I would have not got 40k benefit.

Delivery
Ok all set for delivery on 24 Feb 2014. We liked delivery celebration. There was no issues with blue Hyundai.

Simply sedan - Post 1 - Research

Idea of buying new car was there from almost 2 years. The old Santro was almost 7 years and wanted to change. We had done one round of research in 2012 itself. But due to few reasons we didn't continue the plan.

Cars considered for first research
1. Fiat Linea
2. Maruthi SX4
3. Hyundai Verna
4. Ford Fiesta New
5. Tata manza

After a long research of 2 months and rounds and rounds of test drives, we had leant towards Linea and next in the list was SX4.

Reasons: Linea has great build quality, excellent looks according to me. Sowmya loved Verna in terms of looks than Linea. Many features were loaded in that beast.
Cons about Linea was, very less space inside, driving was lil discomfort due to full clutch, and there were no dedicated service centers at that time

Sx4 was our next favorite.
Why? Due to comfort feeling, excellent driving experience. Great road clearance, feels very good inside.
Cons: Old model, very less features

Ford Fiesta was very small. Tata manza, even though it has huge space, Sowmya dint like looks.

Verna, why we left last time: We loved features, build quality, ride experience, but only point was it had horrible road clearance. It used to kiss road almost in all road humps.

What we considered now?
This time short listing of cars were very different.
1. Hyundai Verna
2. Honda city diesel
3. Maruthi Ertiga
4. Toyota Etios
5. Renault Duster

Why no European cars? We were very much into looks the cars, Vento and Rapid were more blonde compared others, so they were in list

Let's see car by car, our view

Duster: Pro: Superb looks, very rugged, nice driving experience
Cons: cheap interiors, doesn't feel like 10lac car

Etios: Pro: Less price
Cons: almost everything else. Feels like taxi, horrible drive experience, no power at all

Ertiga: Pro: Superb utility vehicle, 7 seater for sedan price, very comfortable all sense. Good value for money
Cons: not a sedan ;), won't feel richness, no Bluetooth ;)

City diesel: Pro: Lovely new design (copied fluidic concept from Hyundai, I would say), excellent space management, a.c. duct for rear seat, loaded with features
Cons: New to diesel engine, little expensive, headroom could have been improved, no offers no discounts

Verna: Pro: We had already soft corner, they had improved ground clearance. Sexy looks, loaded with features, feels very posh
Cons: seats could have lil broader, rear seating comfort could have been improved, year end offer was extended and i got free insurance

Verdict went in favour of Verna, booked the vehicle on 30 Jan 2014.

Tuesday, January 14, 2014

XBMC project - Post 6 - Installing NAS

Story Board:
Post 1http://blog.karthiksunil.com/2013/07/installing-home-media-centre-dyi-xbmc.html
Post 2http://blog.karthiksunil.com/2013/07/xbmc-project-what-you-need.html
Post 3http://blog.karthiksunil.com/2013/07/xbmc-project-post-3-operating-systems.html
Post 4http://blog.karthiksunil.com/2013/07/xbmc-project-post-4-installing-openelec.html
Post 5http://blog.karthiksunil.com/2013/07/xbmc-project-post-5-updating-to-latest.html

Make or Buy decision :)

The latest on my XBMC project is that, I added NAS to my landscape. After a lof research, I decided to buy Iomega IX2-200 as my NAS. Initially I thought of building my own NAS using an old PC and installing FreeNAS on it. May be I did not have enough enthusiasm or din't get right hardware, I dropped the idea and went for a ready made NAS. I bought used NAS (IX2) from eBay. Actually it was not used, the box seal was just open, everything was intact. Seller could not sell as new as seal was opened. Seller was from Bangalore, I went to his shop in SP road and checked the box, tested and bought it for RS 10,500. More over he gave the bill as of current date so that I get company warranty for 2 years from purchase date. MRP of new box was RS 19,000. It was a good deal for me 

Upgrading firmware
This is the first thing I did. The box import date was Apr 2013. As it was pretty old, I wanted to upgrade to latest firmware. Downloaded from Lenovo, Iomega site and uploaded to NAS and upgraded. It upgraded without any glitch. 

Using NAS
It was pretty straight forward. Almost plug n play :).. Created users/ admin users etc and started using web interface. All was well :)

My Initial feeling
Slowwwwwwwwwww file transfer. I get 1-2 mb/s using SMB file transfer. FTP was better 10-15 mb/s.
Otherwise it is just fine.

Backed up my old 1 TB HDD, my phone, my laptop. Everything took almost 2 days.

Integrating with XBMC
Added my NAS as source in XBMC and it could stream audio, video and pictures without any issues.. No issues with streaming media files